Tuesday

Plasticulture and Drip Irrigation

Fact #1 Plants need water everyday
Fact #2 I have better things to do than water my plants an hour a day
Logical conclusion: Irrigation system that waters your plants for you evenly and equally everyday

Solution= drip irrigation system

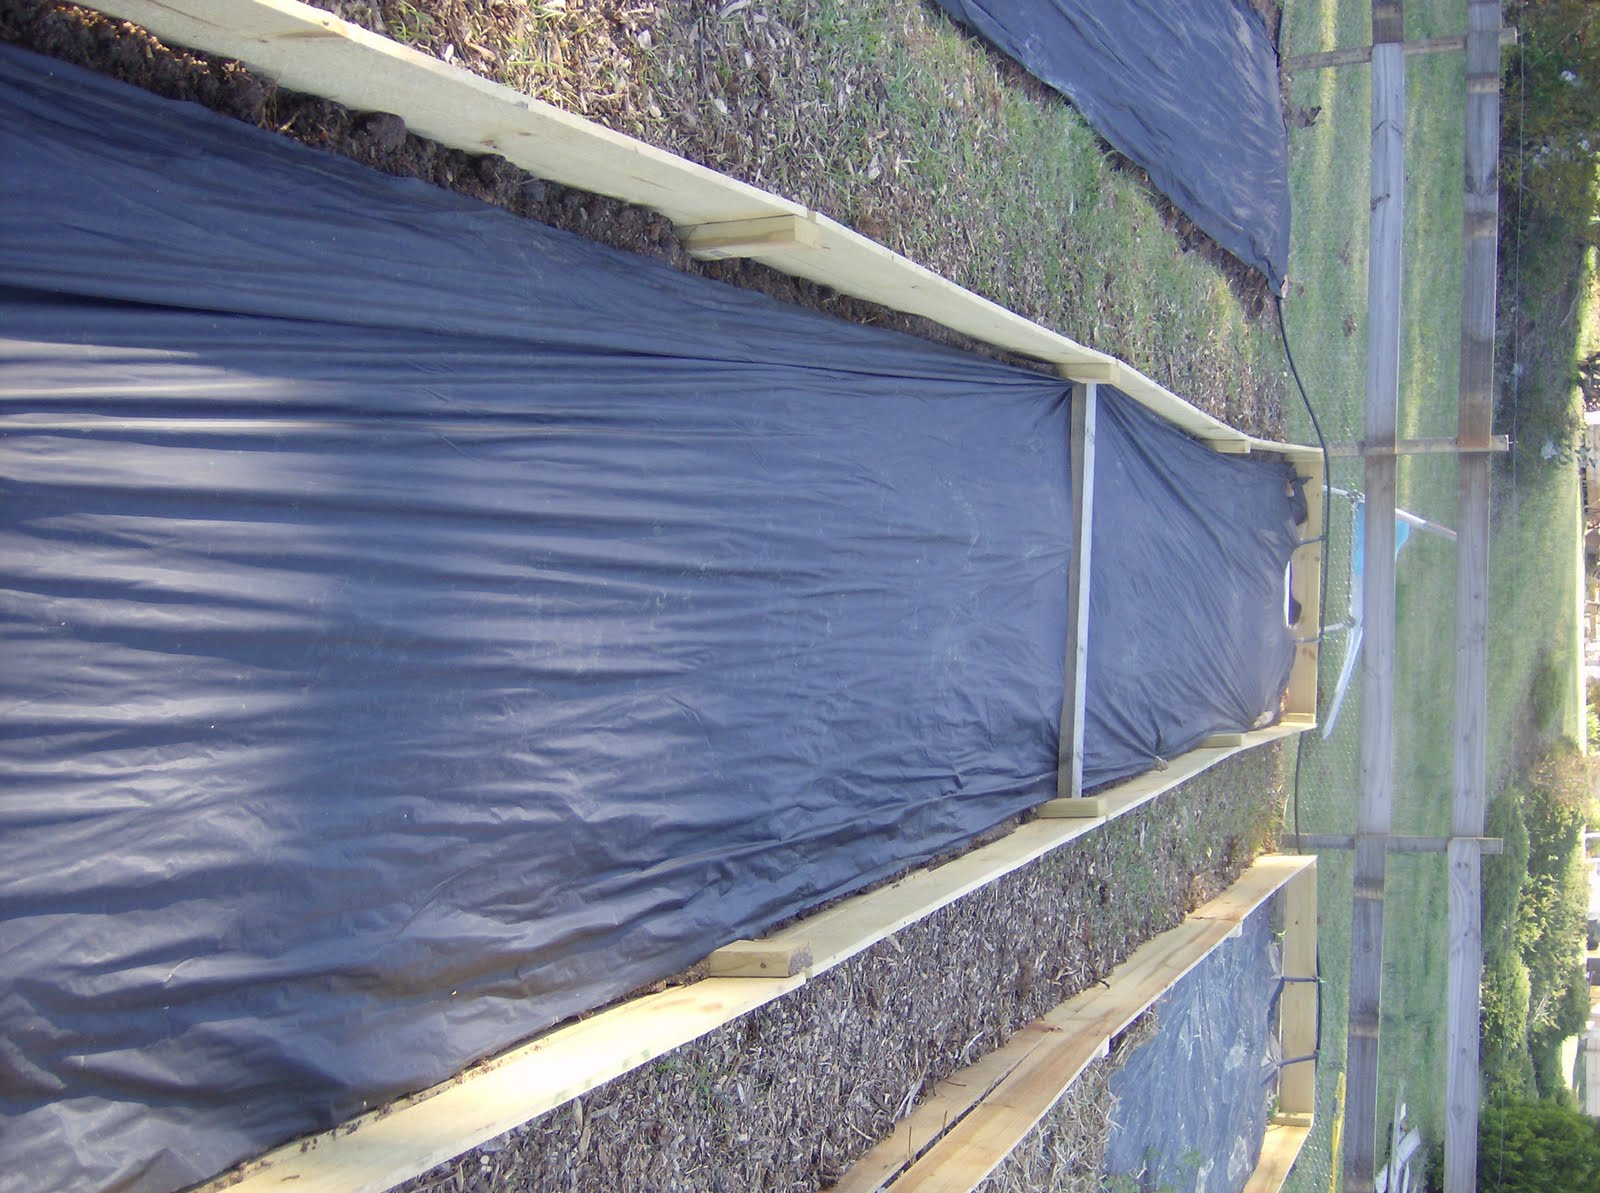
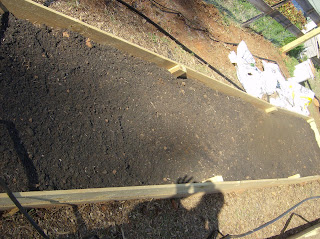
Ok. So I know I said only 400 for the whole garden, but I had to spring for an irrigation system it would have taken me at least an hour to water my garden everyday and with a baby, I cannot promise that kind of free time. I got a small garden drip irrigation kit from irrigation mart for $115.00. I thought set up would be rocket science but after reading the instruction a few time (aren’t you proud) I got it set up. Drip Irrigation is not just about laziness, it is the ideal watering situation and takes less than ½ the water as traditional ‘hose’ method because you loose no water to evaporation. Plants get their nutrients from the water they soak up so inconsistent watering creates less healthy plants. Also watering the roots directly preventing fungus problems that ca develop when water sit on leaves and stems. Drip irrigation (when water is on) drips water through tiny wholes in a plastic flat hose. All this is pressure regulated so you just turn the hose on. The hose (or tape) is buried in the ground to the roots have first access.

Fact#1 Gardens get weeds causing unhealthy plants
Fact #2 I have better things to do then weed everyday
Logical conclusion: no hassle mulch that weeds cannot grow through

Solution=plasticulture

Plasicuture is the ideal mulch. I is cheap, lightweight, and weeds cannot go through it (unlike straw, bark, paper, and other mulches). Garden Plastic is so thin that I can squish enough for my 700 square foot garden in a ball the size of a basketball, and its recyclable.(I go through more plastic from soil and fertilized bags than I do plasticulture) No weeds, Warm soil, and water cannot escape the plastic, so you conserve all moisture. The community Garden I work with doubled their vegetable production with the use of drip tape and plasticulture.

filter and pressure guage

Shut off valves

drip tape connectors

Bury the tape in the soil

Tape is hidden beneath soil


all done

Building Good Soil

There is no secret recipe for awesome soil. It needs to have good drainage, right ph and available nutrients. Rule #1 is getting your soil tested by your local extension office. its less than 10 bucks and there is not other way you know what nutrients you need and how much for what you want to grow (shameless plug but necessary).

Once your soil is tested, follow their recommendations

PH
if your PH is too high add sulfur, too low add lime. Most Ga soil needs lime (unless planting blueberries)try and mix it in the fall before the growing season!

Fertilizer
Add the amount of 10-10-10 the soil test recommends. If you want to be totally organic, good luck you will be shoveling poo poo till you die. Obviously some plants want more of something than another, but I am talking soil prep here, not individual plant needs.

Drainage
I used 40% Georgia nasty clay, 25% sifted Top Soil Delivered by the scoop (from any landscape company)20% bagged top soil, and 15% bagged compost. No secret recipe, the price was right and the spirit moved.

CLAY


+ Sifted Topsoil

+Lime

+ 10-10-10

+ bagged topsiol and compost= AWSOME

Anti Critter Solutions: Peanut Butter and Magic Juice

Probably the second most important thing about gardening besides having sun, is pest control. I family of deer, rabbits, and sometimes squirrels can wipe out an entire garden in one night. Don’t get me wrong, im a hippie who loves all my forest creatures, is sing to them, I pet them, but I do not want to put hours and hours of work into filling up their little bellies!

DEER- the biggest problem we have. We did container gardening last year just to see if they would be a problem and they ate everything (a mommy and two little baby deer). Deer can jump an 8ft fence if they really wanted to, so how do you keep them out do you ask? The only way to keep them out if you already have an existing deer population is to get electricity involved. Basically you charge a wire and put peanut butter on it. An unsuspecting deer comes to lick of the butter and BAM. They never come near the Garden again (peanut butter is necessary so the deer do no simply jump the fence and move right on to veggies)

We had 16 feet of a dilapidated fence in our back yard, so we dismantled it and built a pasture fence out of it. This fence will keep nothing out, it just hold up the electric wire (you can also use PVC pipe every 20ft. we just wanted a more permanent structure). Because we used wood we needed something to insulate the wire- we simply wrapped electric tape around a nail. Then used nine gauge wire and hooked it up to the fence charger (purchased at ace hardware). You also have to ground it with a grounding rod. When we tested it we were nervous and then disappointed to find that there was only a slight sizzle noise when we touched the wire. When we tested the voltage it was off the charts and we were beginning to think we might be X-men, but then we realized that if were X-men their would be no way we would have the same mutation of absorbing electric shock, so we decided to call the charger company. The nice lady on the phone said that we were not mutants, but rather it was our rubber soled shoes that we keeping us from grounding the electricity, meaning no pain. So we took our shoes off expecting little after hyping ourselves out for no reason the first time and BAM. It hurt. Poor Deer.


Rabbits- we added chicken wire to the bottom 1 ½ feet of the fence- costly but priceless

Squirrels- We hope the chicken wire will discourage them, but we also are lining the garden with vining veggies such as squash, watermelon, and cucumber- I hear on good authority that vines spook sqirells. What doesn’t spook a squirrel?

Insects and Diseases- I have a magic potion that will keep my garden mostly insect free and most diseases out.

1 gallon of Water, 2 TBS of Sevin Pesticide Consintrate,2 TBS of Sulfur, and 2 TBS of ‘Dicamba’ fungicide or anything with Chlorathoramil. Its magical if you spray it twice a month.


Old Fence that was here when we bought the house

We ripped it up and made a new fence...

See!

Nails with wire

Charger and grounding rod

Monday

Backyard Garden Layout

SUN: You must have 6-8 hours of sun. There is no negotiating. If you plant in shade you will be disappointed. So for shade people, get the chain saw out or you can only grow mint and maybe some lettuce! Find the sunniest spot in the yard.
How Much? You don’t need that much. I went a little over board because I want to produce locally grown food for my brothers and sisters and parents families as well. When I go, I go all out.

SPACE:
I only have a 1300 square feet of fenced in garden.
I incorporated raised beds to increase my yield per square foot (more on that in Raised Beds)
I did a mixture of North to South beds and East to West Beds. (It is recommended to run beds north to south placing tall crops such as corn and okra on the southern end to avoid shading!)

1. I decided to build 2 (24x4) + 2 (3x18) Raised Beds
2. I also did 2 24 ft. by 4 ft. rows of ’traditional Beds’ for corn, Squash and beans (these plants either like a deep root system or are sprawling vegies. These beds are mounded rather than raised by a structure: Cantaloupe, Pumpkins, and watermelon will also be in this type bed
3. I Left an area for perennial fruits: Blueberries, Raspberries, Muscadine, Blackberries

Raised Bed: Building and Tilling

Raised beds increase yield in spall spaces. Raised bed = more health productive plants! Why? Because you have total control over the soil and the raised aspect helps with good drainage.
There are tons of methods of raised beds. My major concern was Money, i just picked the cheapest sustaining material...


Step One: What size?
Size. I went with 2 Beds 24x4 and 2 beds 3x18. Size really doesn’t matter, this fit my garden plat and irrigation system.
I looked at various options plastic, metal, wood, kitty pools, and decided on wood because it was cheapest. Then deciding what wood to go with was also a matter of price. If you go with wood, make sure it is treated (unless you want to rebuild it every 2 years)… I decided to use fence pickets!
Price estimate for a Bed 4ft wide and 24ft long the …
Treated 2x4(16ft): $ 62.00
Treated plywood ¾”: $ 50.00
Treated fence pickets 6’x5 ½ “: $35.00 WE HAVE A WINNER

It took 16 uncut 6 foot fence pickets, 2 2x4 cut into 11 inch sections, and 2 8 ft. pickets cunt into (making 4 4ft pickets for the end)

INSTALING (tilling & building)
I decided to till the ground first making the soil as loose as possible (You can set the raised bed right on grass, especially if you put wet newspaper down first, seethe book: Lasagna gardening ) After tilling I mounded up the dirt to the center of the row, then I used a shovel to dig into the ground where the edged of the raised bed box would fit into.
Then I made them. If you can’t build a box, you are in bad shape. I really don’t think I can help you.


1. Tilled where i wanted the beds to Go


2.Mounded the dirt


Built beds and fit them in!